Showing posts with label crafts. Show all posts

Stitching up a storm.


I have been a busy bee recently working on a few different crafty projects and stitching cards and such. I have had a bit more free time than usual which has given me time to get out my storage box full of supplies and start some new projects.

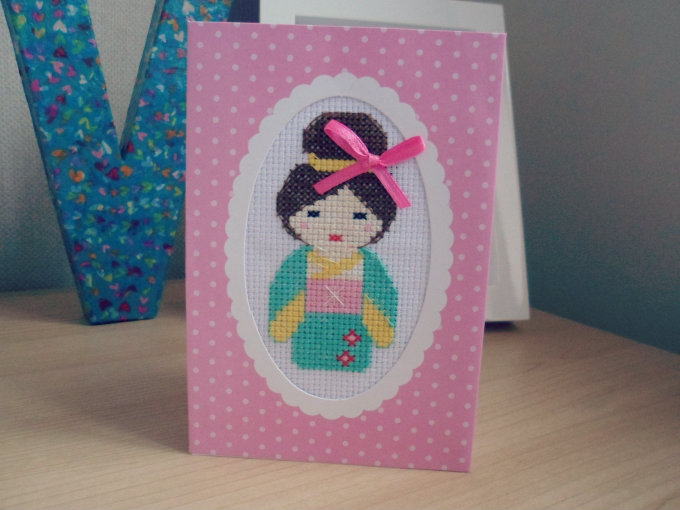
Actually, one of the things I made recently wasn't from my stash of supplies at all but it was a free kit that came with the last issue of Cross Stitcher magazine. I really liked the design and thought it would make a lovely Mothers Day card (don't worry, this won't spoil anything. The card has already been posted and opened!)


The colours on the design were so pretty, bright and cheery and I really enjoyed doing this design, although I have just spotted a little bit of backstitching I missed. Darn it! I also gave the "French knots" a miss as they take me forever and a day to master.

The finished piece of stitching looked great in the pink polka dot aperture card. I think I will make cards using aperture frames more often.

I have also been working on a design by The Frosted Pumpkin Stitchery. The Woodland Sampler to be precise. I signed up a few months ago when it was on special offer for $10.00.

Each month a new design is released and emailed out to the subscribers by email in a PDF. The PDF not only contains the pattern but handy hints/tips and details of the floss colours you will need. The detail that goes into the PDFs means that this project would be perfect for beginners, but it is also a lot of fun for cross stitching pros.


I am a little bit behind, only being halfway through the February design at the moment, but it won't be long until I have finished and can move onto March. The January design, with the two deers and snowflakes, is so cute.

I used the floss colour chart as best as I could then substituted any colours I don't own by picking the closest match (to save buying lots of new thread). I am using cream evenweave fabric as I had a spare piece laying around waiting to be used.

Once I am up to date it will be quite nice to have a small project to do each month when the emails are sent out. Plus, you know that December will be here before we know it and I will have my completed design to look back on and frame for the wall. I'll definitely share the finished piece with you, if not a few of the months as we go along too.

Are you working on any crafty projects at the moment? Send me a link, I'd love to have a nosy!

You have read this article crafts / DIY with the title crafts. You can bookmark this page URL https://oscarthemaori.blogspot.com/2013/03/stitching-up-storm.html. Thanks!

Simple cross stitched card (male friendly!)

It is Jonathan's brother in laws birthday today and, as we are big fans of making cards instead of buying them, I stitched and put together a card for him. I really don't like buying cards as there is usually such a poor selection and between Jonathan and I we have a huge stash of card making supplies. He is actually more into making cards than I am, believe it or not.

I had some blank cards and envelopes left over from Christmas so I covered the front in blue card using double sided tape, as I didn't think the brown card would go with my theme.


I picked a small design to cross stitch from a free booklet that came with Cross Stitcher magazine last month. As the recipient likes sailing/boats I picked a very simple two tone sailing boat design, but the booklet had a whole host of other designs to choose from which will definitely come in handy for future cards!


Once that was stitched up I frayed the edges of the aida, backed the piece onto blue felt and stuck the felt to the blue card (all using double sided tape, something I couldn't craft without!) and voila; a simple, easy and quick card which I hope will be well received!

Do you make cards? I do like to make slightly more extravagant cards sometimes but if I'm short on time I really like the idea of a small cross stitched design catered to the interests of the birthday boy/girl!

My friend made a similar card for me for my birthday (thanks for the inspiration Katy!) and I thought it was such a sweet idea.

Are you a fan of homemade cards?

You have read this article crafts / DIY with the title crafts. You can bookmark this page URL https://oscarthemaori.blogspot.com/2013/02/simple-cross-stitched-card-male-friendly.html. Thanks!

Decoupage bunting.

When I shared my latest craft project on Instagram I received some great comments and questions so I thought I would take a few more photos of my bunting in action.

Decoupage is so easy (that's why I like it!) which means it's a craft anyone can do, including kids. It's quick and messy and you get to peel glue off your fingers afterwards. Who doesn't love to do that?!


Decoupage is a way of decorating different surfaces using scraps of paper and glue. The special "Decopatch" papers can be quite expensive which is why I think places like Fired Arts in Sheffield are a great idea as you just need to pay a studio fee, pick your item with one sheet of paper included, then they have boxes of scraps in all colours and sizes that you can use for your project. You can also purchase additional individual sheets if you wish, instead of a whole pack.

I'm sure there would be something similar in your local area if you fancied giving it a go. Fired Arts offer a mixture of pottery painting, decoupage and mosaic making so there's a little bit of something for everyone/all skill levels.

You can cover pretty much anything you like when it comes to decoupage. Before Christmas I covered a pottery bird in red and green scraps of paper to make a festive tree decoration. I recently covered a paper mache 'V' letter in a fun blue/multicoloured hearts design. I also have several wooden chairs in our spare room which are crying out to be covered!


I find it quite therapeutic and much more satisfying than other types of crafting such as cross stitching which is a much slower process. It's also easy so you can have a brew and a good chin-wag while you're doing it.

You can buy shapes and letters from Hobbycraft (although I don't think the selection at my local branch is very good) as well as a multitude of online shops and Ebay. They're pretty cheap and range in size from teeny tiny to humongous.You can also cover pottery items such as decorations, trinket boxes, money boxes and photo frames to name a few.

Happy crafting! If you do give this a go don't blame me for your new found addiction ;)
You have read this article crafts with the title crafts. You can bookmark this page URL https://oscarthemaori.blogspot.com/2013/02/decoupage-bunting.html. Thanks!

Handmade Christmas presents.

I made a couple of cross stitched pieces as Christmas presents this year and would have made more had I had the time. I love cross stitching but it can be very time consuming so this year I only managed to make two gifts.

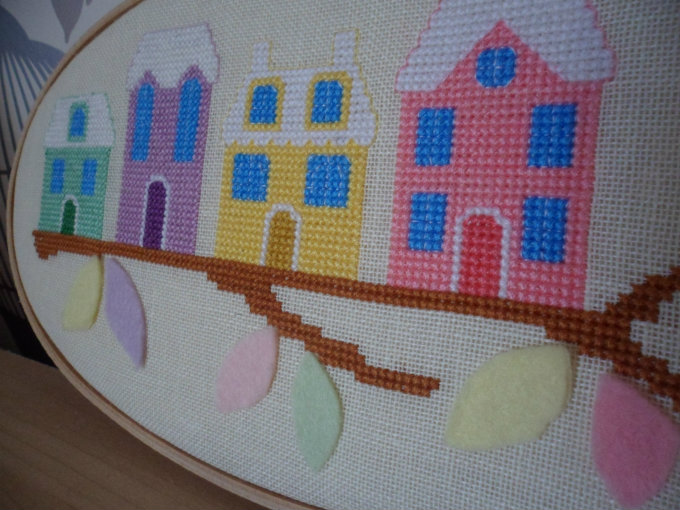
One was a pattern from Cross Stitcher magazines with a row of pretty pastel houses with some felt leaves, the other was a pattern I bought from Etsy (here) declaring "keep calm and drink wine".


The house design took quite a while to make but I'm really pleased with how it turned out. I have got plenty of leftover fabric and thread so I am thinking about making another one to keep. This one went to my sister and her husband.

Each window has white backstitching which is a nice detail when you look closely and I really enjoyed incorporating felt especially as the colours were so pretty.

The "keep calm" pattern was much quicker to stitch and I really enjoyed making it. This one went to my mum who likes... well, wine obviously!


Did you make any presents this year?
You have read this article christmas and resolutions / crafts / DIY with the title crafts. You can bookmark this page URL https://oscarthemaori.blogspot.com/2012/12/handmade-christmas-presents.html. Thanks!

My homemade Christmas cards.

First things first, I hope you all had a very merry Christmas indeed and you're all stuffed full of chocolate and turkey and all the rest of it.

I feel so lucky this year as I received so many wonderful presents and got the chance to spend a few days with family including my sister and my brother in law who live on the Isle of Man so I don't get to see them very often.

Unfortunately my Dad has spent Christmas in hospital due to a recent knee transplant operation but we have all been visiting him and took him some presents to open on Christmas Day. It turns out the Christmas lunch in the hospital wasn't so bad and he has been showered with food by visitors so at least he isn't going hungry. Fingers crossed he will be out in the next couple of days and can take it easy for the rest of Christmas into the New Year.

I'm back home now with Jonathan (well, I will be when he gets back from watching ice hockey!) and on the cards tonight there are festive leftovers for dinner, The Artist to watch and no doubt I'll be playing with my new Kindle Fire HD (thanks Mum & Dad!)


I made my own cards this year and they have had some great comments by family and friends (and people on Instagram) so I thought I would share a few photos with you. They weren't massively cheap to make as I needed a new supply of cards and envelopes, and I bought loads of ribbon and the snowflake stamp. But next year I'll be set as I've got all sorts of bits left over.

I cross stitched different images onto white aida in red and white cotton then backed them onto either red card or red felt. I also embroidered "Merry Christmas" onto white aida and used tiny gold seed beads for the dot above the i. I had a few scraps of felt in my stash already so it was nice to use that up and I've got plenty of red card left for next year.


I rearranged bits of ribbon, snowflakes and the cross stitched/embroidered pieces willy-nilly and off they flew to friends and family.

I didn't really have a plan when I started making them but I think they came together quite nicely in the end.

Do you make your own Christmas cards? I must admit I only made around 10 of these as I ran out of time so we sent out a few shop-bought ones to make sure we didn't miss anyone out but hopefully if I start a bit earlier next year I will get enough finished (August should do it I reckon!) ;)

Merry Christmas everyone x


You have read this article christmas and resolutions / crafts / DIY with the title crafts. You can bookmark this page URL https://oscarthemaori.blogspot.com/2012/12/my-homemade-christmas-cards.html. Thanks!

Fired Arts, Sheffield.

A couple of weeks ago I visited Fired Arts in Sheffield for the first time for an evening of wine, nibbles, decoupage, pottery painting and mosaic making. I knew about Fired Arts as my friend has been quite a few times so when her friend organised a girly night and I was invited along I decided to give it a go.

I was a little bit apprehensive about the pottery painting side of things as I am not blessed with much artistic talent or patience, but once we arrived I spotted the Decopatch stand and decided that would be much more suited to my limited skills. Plus they had such a huge choice of things to cover in pretty paper from 3D animals to Christmas ornaments and everything inbetween.


Our evening session (7pm until closing time at 10pm) cost £15 each and for that we could pick items either up to the value of £15, or higher and then pay the difference. All of the items ready to be painted or used for decoupage have the price written on so it's easy to pick items in your budget.

I wanted to do the deer head but at £25 it was a bit too extravagent for my first visit so I chose a wooden teapot and sailboat, as well as a small pottery bird. My friend chose an owl tealight holder and picked perfectly pretty colours to decorate it with.


With the decoupage I got to choose one new piece of paper from the stand as well as having 4 big baskets full of scraps to dip into.

I didn't produce the neatest decoupage that the world has ever seen but it was really fun and I definitely want to have another go. In fact I popped to Hobbycraft to stock up on supplies last week (as it's much closer to me than Fired Arts) but their selection was rubbish so I have been looking online to buy a few bits instead. Failing  that I will have to pop back to Fired Arts! Oh what a shame ;)


The bird I made has pride of place on our Christmas tree after I popped a bit of red and white twine through the hole. Now all I need to do is find a way to hang up the sailboat and teapot!

Have you ever done pottery painting or decoupage? Do you have a placed like Fired Arts near you?


You have read this article crafts / diary / share the love with the title crafts. You can bookmark this page URL https://oscarthemaori.blogspot.com/2012/12/fired-arts-sheffield.html. Thanks!

Operation finish what you started: robin tree decoration.

This is another project I started and forgot all about, being distracted by shiny new things. It was a free gift with Cross Stitcher magazine the issue before last and it's so adorable. 

I love the felt frame and wish I had made a template to make a few more. It was dead easy to make: stitch the pattern, back the aida onto white card/fabric, sew the ribbon onto the back piece and finally use fabric glue to secure everything in place. I left mine under a heavy book overnight just to make sure the glue had set.

If only I wasn't finishing it off at gone midnight I might have got the robin a bit more central! Ah well, who wants to be perfect... ;)


You have read this article crafts / DIY with the title crafts. You can bookmark this page URL https://oscarthemaori.blogspot.com/2012/11/operation-finish-what-you-started-robin.html. Thanks!

Operation finish what you started: hot air balloon framed cross stitch (Emily Peacock design).

I am the WORST at starting something, leaving it half finished and getting distracted by something else shiny and new before ending up with a pile of half finished projects which then makes me anxious. So, I vowed not to start anything new until I finished my other projects and I've stuck to it (kind of).

First on my list was to frame and hang my balloon cross stitch which I finished quite a while ago but left to gather dust in a corner. It feels so nice to have this finally hanging up in our bedroom, as it took me so long to stitch it. I feel quite proud that I made this, with my own fair hands.

It was a pattern from Cross Stitcher magazine a good few months ago (issue 254). It has been the best issue of the magazine this year in my opinion. I think I wanted to make every single design in there, so if you're looking to pick up back issues I can really recommend this one.

What do you think? I hope you like it as much as I do!

You have read this article crafts with the title crafts. You can bookmark this page URL https://oscarthemaori.blogspot.com/2012/11/operation-finish-what-you-started-hot.html. Thanks!

DIY: table & chairs using Annie Sloan chalk paint (& a lot of elbow grease!)

I have been dying to share some photos of our newly painted and sanded table and chairs which take pride of place in our dining room. After a fair bit of hard work and paintbrush induced blisters we are so pleased with the final result.


When Jonathan and I moved into our new home together last November we gained some extra rooms and had a long list of furniture to buy for our extra space. We live in a 3-storey house where the garage has been converted to make an extra room which is brilliant, as we wouldn't utilise a garage enough and our driveway is big enough for 2 cars.

We decided we wanted this room to be mainly a dining room, but it also has a comfy sofa area and a tv so it doubles up as a relaxing space as well as being my workout space too. A multifunctional room if ever there was one!

A family member of Jonathan's offered to give us a dining table and 6 chairs that they no longer needed, and as we were on the lookout for a dining table we jumped at the chance.

The table and chairs are wooden, but were coated with layers and layers of varnish which was quite dark and not to our taste. Also it didn't fit in with the colour of the wooden floor and the other things in the room, but we used it for several months using tablecloths to disguise the dark varnish.

The table mid-sanding and the chairs pre-painting

It was always on the radar to sand it down, but it was such a huge job that it was always at the bottom of our "to do" list. Eventually we sanded a little bit of the table top which revealed such lovely wood underneath that we were determined to transform it into something we loved.

When I heard about Annie Sloan paint I knew I had to get my hands on some for several reasons. Firstly it can be painted over varnished wood, so there would be no need to sand the entire table and all of the chairs, and the colours in the range are all beautiful - think creams, greys, duck egg blues, and lovely greens. I had seen several table and chair sets with a wooden top and cream legs/chairs so I thought that using one of the lovely Annie Sloan shades would definitely give us the look we wanted.


We opted for a tin of Cream and a tin of Paris Grey with the view to have chairs in both colours to break it up a little.

Now this is my kind of painting, slapping it on with no priming or sanding to do, and getting really good coverage due to the thickness of the paint. Between Jonathan and I it didn't take too long to get the chairs done which left time to use plenty of elbow grease to sand the table top by hand. The layers of varnish soon started to come away, leaving a lovely wooden table.

Once the table legs were painted I went over everything with a second coat. One coat would have sufficed had we wanted a slightly "shabby chic" look as in places the paint hadn't fully covered the varnish, but as we didn't like the varnish colour underneath a little bit of touching up with a second coat looked much better.


We didn't use any wax over the top however this is something we plan to do at some point to protect the paint from any greasy marks or chips.

I'd love to try doing a piece of furniture with one coat of Cream and a top coat of Paris Grey (or vice versa) then sanding down the top coat to give a lovely used look. We have got plenty of paint left so I'm definitely keeping my eye out for my next victim!

We are so pleased with our new table and chairs. For the price of two tins of Annie Sloan paint and a couple of brushes we have a beautiful table set which fits perfectly with the room. We make a point of always eating our table at the dinner now and we are proud of what a little bit of elbow grease has produced.

You have read this article crafts / DIY / home sweet home with the title crafts. You can bookmark this page URL https://oscarthemaori.blogspot.com/2012/09/diy-table-chairs-using-annie-sloan.html. Thanks!

Goonies never say die!

Another day, another finished cross stitch piece. This time it's something we have kept for ourselves as we think it's brilliant! 

Remember I told you about weelittlestitches on Etsy? I purchased their Justice League of America pattern and stitched Superman and Wonder Woman as a wedding present for some friends who got married recently (I blogged about it here). Well, I also purchased another couple of patterns at the same time and I couldn't wait to get started on The Goonies! If it's not one of your favourite films of all time what the hell is wrong with you?! ;)


Luckily a lot of the thread colours from the Justice League pattern came in handy for The Goonies, and for the colours that I didn't have I picked the closest match from my thread collection, so it cost peanuts to make as I didn't have to buy any new colours.

That's the great thing about being subscribed to magazines like Cross Stitcher - you get a lot of great thread colours with their free gifts so I save them all for a rainy day. I also have a big bumper pack of thread that Jonathan's Sister bought me for my last birthday which has pretty much every colour you could need, so that has been a lifesaver for patterns like this where you may only do a handful of x's in one colour.


It has been one of those projects that I've been doing inbetween other things but had I stitched it continuously it wouldn't have taken long at all. There is a fair bit of swapping colours and checking back to the pattern which takes up a fair chunk (< ha geddit?) of time.

It now hangs with pride of place on our picture wall in our computer room ready to be joined by the next set of pixel people that I'm working on. I've also got my eye on another pattern I'd like to buy. I need more hours in the day!

You have read this article crafts with the title crafts. You can bookmark this page URL https://oscarthemaori.blogspot.com/2012/08/goonies-never-say-die.html. Thanks!

'&'

Another day, another cross stitch. I ordered the kit for this ampersand design a few weeks ago from The Shop at Number 57 which I stumbled upon not long before. I've been eyeing up pretty much everything they sell, especially the cross stitch kits, since I found the shop and I love the design/feel of the website very much so!

My order arrived swiftly and was wrapped up so nicely. The ribbon it was wrapped in has been well and truly stashed away to use again another day.

The instructions and chart that come with the kit are brilliant. They cover everything you need to know as a newbie, and even though I know what I'm doing I picked up a few tips myself after having a read through. The kits would make great gifts for a friend or they're ideal to buy if you haven't cross stitched before and you don't quite know where to start.


This is the first design I have stitched which has used only one colour of thread and I did find that I had to pick it up and put it down, and stitch little and often, otherwise it got a little bit boring.

However, saying that I am really pleased with the finished result and it will look great on our new sideboard when Next Home finally get it back in stock (this prompted me to check the website and they have it - hurrah!) For now it lives on our bookcase amongst my other favourite bits and bobs (including the typewriter in the background which I picked up a couple of weeks ago).
You have read this article crafts with the title crafts. You can bookmark this page URL https://oscarthemaori.blogspot.com/2012/07/another-day-another-cross-stitch.html. Thanks!

First a "super" wedding.. now a "super" cross stitch.

You may have seen the blog post I did on the wedding we went to in Sheffield a few weeks ago at the Botanical Gardens. The bride and groom are comic book enthusiasts and love all manner of superheroes and heroines.

When I found the weelittlestitches shop on Etsy I immediately wanted to make all of the patterns. After sharing the shop with Jonathan who declared he would learn how to cross stitch because they were so awesome (he hasn't btw!) I bought 3 patterns.

We decided it would be a nice idea to make something for the bride and groom for when they return from their 3 week American road trip (not jealous one bit...) using the Justice League of America pattern that I purchased.


I took the Superman and Wonder Woman figures and cross stitched them onto some white evenweave fabric using the colours on the chart (I used DMC thread). I added their names and the date of the wedding using a simple back stitch and voila! One Ikea frame later and I think it looks rather good, even if I do say so myself.

The bride returns to work tomorrow after 3 weeks off so hopefully a little present will cheer her up.

You have read this article crafts with the title crafts. You can bookmark this page URL https://oscarthemaori.blogspot.com/2012/07/first-wedding-now-cross-stitch.html. Thanks!

Good enough to eat.

I've gone cross stitching mad recently and have been tasked with making a few things for our home and for others. I'm currently designing something for my Sister, making a wedding present for some newlyweds and I just finished stitching a cupcake for a birthday card.

I'm really pleased with how it turned out especially as it's a little bit different to my usual choice of pattern (it's by Cross Stitcher magazine by the way). I didn't have the exact colours to hand so I'm happy that the alternatives I picked worked well.

I don't know about you but now I'm hungry!

You have read this article crafts with the title crafts. You can bookmark this page URL https://oscarthemaori.blogspot.com/2012/06/good-enough-to-eat.html. Thanks!

Jubilee party & a workshop at The Button Tin, Rotherham.

Last Saturday my friend Katy and I booked ourselves onto a workshop at The Button Tin in Rotherham (which I mentioned in this post). The Button Tin is located inside the Imperial Buildings in the centre of Rotherham which is really quite a fascinating place. It is most definitely worth a look if you're passing. My friend and I dream of opening our own shop (a bead & supplies shop to be precise) in one of the empty units but we would require a lotto win of some sort first.

To join in with the jubilee celebrations the Imperial Buildings housed a party full of live music, bunting, cakes, poetry, cups of tea, a vintage style hairdresser, and workshops to take part in. 


Katy and I opted to do the half day workshop where we spent a good few hours picking out materials and making bunting. It was such a lot of fun although I'm so bad at picking colour schemes and fabrics. That was most definitely the hardest part, but once I got going I was fine. It was great to take in the atmosphere and the music whilst cutting, ripping and pinning fabric together.


We were stationed on tables outside The Button Tin workshop but there were ladies inside on the full day workshop. After a peek inside to have a nosy and marvel at all the wonderful things Gemma keeps in her workshop we could see they were making the most beautiful fabric pieces with freehand sewing machine writing, buttons, embellishments and all sorts.

We will definitely be signing up for another workshop once some new dates are published. I haven't used a sewing machine since I did my Textiles A-level so I will no doubt need to brush up my skills (I am flabbergasted at just realising that my A-levels were nearly 10 years ago! *sob*). I'm toying with the idea of buying a mini sewing machine from John Lewis but I'm not sure whether I'd have the confidence to make things at home.

Lots of people turned up to the jubilee celebrations and so many people were dressed in vintage clothes, really getting into the spirit of things. The vintage style hairdresser was busy transforming modern hairstyles into victory rolls and I was very tempted myself but unfortunately we didn't get chance.


There are a handful shops within the Imperial Buildings so once we were all bunting-ed out for the day we had a browse round and I picked up the most pretty vintage plates. I thought they would perfectly house a piece of cake but since I got them home I've been too scared to use them as they're so delicate.

Have you done any Button Tin workshops? If not, have you got any plans to? You should!

You have read this article adventures / crafts / diary with the title crafts. You can bookmark this page URL https://oscarthemaori.blogspot.com/2012/06/jubilee-party-workshop-at-button-tin.html. Thanks!

My latest project: cross stitched wedding scrapbook.

I wanted to make my Sister and her new husband a present in addition to the wedding gifts we bought them. Just a little something handmade and special for them to keep.

I actually ordered the thread for this quite some time ago then chickened out as the stitch time on the pattern scared me a little.. but one day I bit the bullet and decided to make a start.


Slowly but surely the pattern came together over the weeks that followed. I had to keep picking it up and putting it down inbetween other projects as it was a little fiddly to follow, but hoorah - I finished it and it is now over on the Isle of Man for my Sister to fill with keepsakes and photos from the wedding and the trip to Vegas.

Jonathan and I have a scrapbook and they're such a great idea. We have kept literally everything from everywhere we've been and stayed and eaten. They will be great memories to look back on when we're old and wrinkly.

You have read this article crafts / DIY with the title crafts. You can bookmark this page URL https://oscarthemaori.blogspot.com/2012/05/my-latest-project-cross-stitched.html. Thanks!